Ear Warmer Beanie
Oh winter is coming...........and it promises to be a COLD one with lots of snow this year. For a gal with short hair, that means cold ears. Yeah, a hat helps some, but my ears still get cold. So what's a gal to do.........get out her trusty crochet hook and some yarn.......see what the mind can design. I present to you my Ear Warmer Beanie. A hat for the top of your head with a built in ear warmer. And it's simple enough for an advanced beginner, due to BPDC and the trick with the SC. It's reversible (if you don't like the ridges showing, I like them).
This was the first one I made with some variegated yarn. I had been trying my hand at pooling (no luck), so thought I'd better do something with the yarn. Boy, was it a learning curve, but all the better as I learned from my "mistakes" (design elements here). I used only one hook size (J). The hat fits, but it's way too tight. The next one fit better.
(That little speck you see on the back of my hat, is a hair clip that I'm using as a stitch marker.)
So on to the Pattern:
So on to the Pattern:
Materials: Any Worsted Weight yarn, Hooks J & K; C hook (optional for "bling")
Key: Ch-chain, DC-double crochet, st(s)-stitch(es), sl st- slip stitch, J/w-Join with, Rd(s)-round(s), BPDC-Back Post Double Crochet, Front Loop
Crown: Rd1: Magic ring (or ch 4, j/w sl st to form a ring). 12 DC in the ring. J/w sl st.
Rd2: Ch 2, 1 DC in same stitch, 2 DC in each stitch after until back at the beginning. J/w sl st. (24 dc)
Rd3: Ch 2, DC in next st, *2 DC in next st, DC in the next 2 stitches*, repeat all around until back at the beginning. J/w sl st.
Rd4: Ch 2, DC in next 2 sts, *2 DC in next st, DC in next 3 sts* repeat all around until back at the beginning. J/w sl st.
Rd5: Ch 2, DC in next 3 sts, *2DC in next st, DC in next 4 sts*, repeat all around until back at the beginning. J/w sl st. (At this point I was able to stop making the crown of the hat. The diameter of the circle was 6-1/2". It fits approx a 21-22" head.)Now we are going to make the Sides of the hat:
Rds6-10: Ch 2, DC in each stitch around. (This should bring you right to just above the top of your ears.)
Ready to start the ear warmer section? Change to the larger hook- K-
Rds11-15: Ch 2, Back Post Double Crochet (BPDC) in each stitch. Continue this around until you complete Rd15. (This creates the ridges to double the fabric to warm your ears.)
Rd16: Finish- Ch 2, SC in all the sts around, BUT insert your hook on the underside of the Front Loop Only. (This will show as another ridge, and is important to learn, in case you wish to customize your hat.) Now you're done, if you wish., but what if you want a little more "bling", or just another layer to the ear warmer???? Never fear, I'm here to show you how.
Let's Add Some Bling
(It will also add another layer to the ear warmer, making it even warmer.)
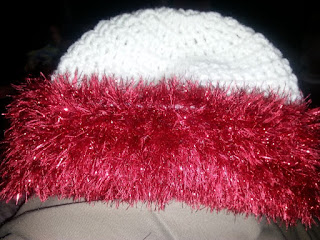
Doesn't this look Christmasy?
Doesn't this look Christmasy?
To add this layer, turn your finished hat upside down. We will be working on the last ridge formed.
(I used a Red Glit Eyelash yarn from Yarn Bee with a C hook)
Rd1: With a slip knot on hook, insert hook into the underneath front top loop of the first dc on the bottom ridge, do a SC (just to the left of the seam line), SC into that stitch again, then 2 SC into each stitch around until back to beginning of row.
(This yarn is a lot smaller in thickness, that's why 2 stitches into one, also the smaller hook.)
Rd2+: Join yarn into the seam line with a SC, then move to the next ridge, 2 SC in each stitch around exactly as done in R1, until back at the beginning. Repeat until all ridges are covered.
For more information on How to properly size crochet hats read this article. Good luck.
© LaceAngel 2016
Now enjoy!
Note: This is very easy to resize simply by changing the crown circle hat, or yarn and hook size.For more information on How to properly size crochet hats read this article. Good luck.
© LaceAngel 2016


5 comments:
WOW! This is a very good pattern!!! And, I LOVE the hat. One 'small' thing I'd change is the WW for Worsted Weight yarn. I made this mistake on MANY patterns at first, and was overwhelmed with people asking me what kind of yarn WW was.
Also - HOW IN THE HECK DO I FOLLOW YOUR BLOG? Could you put a button on it?
Made that change, still writing pattern.
AWESOME!!!!
Do you have a picture of how the Ear Warmers are attached to the Beanie?
Love2Sleep The ear warmer is not attached, it is crocheted at the bottom of the hat (all in one piece). The bling is the only part that is crocheted on after the hat is completed.Hope that helps.
Post a Comment