Wednesday, July 25, 2018

Scrubby-doo Duo

Scrubby-doo Duo
Scooby-doo your cleaning supplies are ready! I’m really pleased with how this set turned out.
Both yarns used are 100% cotton. So feel free to use this as desired, i.e. dishcloth and shrubby,
or an exfoliating body washcloth and facial scrub.   Or it will handle those pesky cleaning chores.
*Sizes: Dishcloth approximately  7" W x 8" L; Scrubby approximately 3-1/2" square.  
*Of course size will depend on your tension, how many FSC’s you make for width,
and how many rows you choose to make for your length.
Materials: Crafter’s Secret Yarn -1 skein (Extra Sprinkles)
and Scrub-olgy [100% COTTON] (Summer Song)- 1 skein (will have quite a bit left over of this),
[Both yarns are available at Hobby Lobby], Hooks H & G,  yarn needle, stitch marker
Key: FSC - foundation single crochet, SC - single crochet, HDC - half double crochet,  CH - chain,
BLO - back loop only, FO - finish off
Notes: I made the dishcloth first, so edged it with HDC just to give it more of a definite edge .
But I tried a different edge on the scrubby, If you make the dishcloth using  the change,
I believe you will be able to get 1 dishcloth and 2 scrubbies. See pictures for help.
Row 1: FSC with an H hook as many as desired the width of dishcloth to be. I did 27 FSC. Turn.
Tip: When doing a foundation stitch to start a project, use a hook one size larger than the body
of the project. It helps keep the edge straight. Change to G hook.
Row 2 : Ch 1, SC in BLO of each stitch across row. Turn.
Rows 3 to ?: Repeat Row 2 to one row short of desired length. I had a total of 34 rows at this point.
Last Row of Body: (Row 35 for me)SC in both top loops all across. Do not FO,  
Tip: just put a stitch marker in the loop to keep the yarn from pulling out.
Now add the scrubby yarn: Decide which side you want to put the scrubby yarn on.
Put a slip knot on hook, insert hook from underneath in first front loop stitch in first row of back loops.
(This loop will be exposed.) Pull working yarn through, now SC in each front loop across.
At the end of the row, ch 1.
Tip: To make it easier, fold the dishcloth over with the front loop row exposed, at the top.
See pictures for help.
Row2 until end of the exposed front loop rows:  insert hook from underneath in the first exposed front
loop in the next row of back loops, SC in each exposed front loop across. Ch 1, turn.  
Repeat this procedure until all front loops in every row contain a SC of scrubby yarn. FO.
Border (Optional):  Go back to body of dishcloth where you left the yarn, now HDC around entire edge
of dishcloth, placing 3 HDC’s in each of the four corner stitches. FO, make sure all ends are woven in.

Small Scrubby: This will make its own border as you are making the item.
(It’s also how I plan to make my dishcloths in the future, uses less yarn than adding a border.)
Tip: Except for row and stitch count plus the absence of an added border, this is worked basically the same way.
Row 1: 13 FSC with H hook, Ch 1, turn. Change to G hook.
Row 2:SC in the first SC, SC  in BLO of each stitch across, until the last st,
SC in the last stitch as” normal”.Ch 1, turn. [as” normal”. Means through both top loops}
Repeat Row 2 till you have a total of 14 rows.
Tip: The regular SC’s in the first SC and the last SC forms the right and left hand borders.)
Row 15: SC in top loops all across. Ch 1, turn. FO.
Now add the scrubby yarn: Decide which side you want to put the scrubby yarn on.
Put a slip knot on hook, insert hook from underneath in the 1st front loop in the first row of
back loops. (This loop will be exposed, will actually be the 2nd stitch of the row)
Pull working yarn through, now SC in each front loop across. At the end of the row, ch 1, turn.
Warning: Do not SC in the last stitch of the row.
Tip: To make it easier, fold the dishcloth over with the front loop row exposed, at the top.
See pictures for help.
Row 2 of the exposed front loop rows:  insert hook in the bottom side of the first exposed front loop stitch,
(this will be the 2nd stitch of the row) in the next row of back loops, SC in each exposed front loop across.
Ch 1, turn.  
Repeat this procedure until all front loops in every row contain a SC of scrubby yarn. FO.

Wednesday, October 12, 2016

It's almost here


Be sure and go here to find the detailsStitch and Unwind

Monday, October 3, 2016

Ear Warmer Beanie

Ear Warmer Beanie

Oh winter is coming...........and it promises to be a COLD one with lots of snow this year. For a gal with short hair, that means cold ears. Yeah, a hat helps some, but my ears still get cold. So what's a gal to do.........get out her trusty crochet hook and some yarn.......see what the mind can design.  I present to you my Ear Warmer Beanie. A hat for the top of your head with a built in ear warmer. And it's simple enough for an advanced beginner, due to BPDC and the trick with the SC. It's reversible (if you don't like the ridges showing, I like them).
This was the first one I made with some variegated yarn. I had been trying my hand at pooling (no luck), so thought I'd better do something with the yarn. Boy, was it a learning curve, but all the better as I learned from my "mistakes" (design elements here). I used only one hook size (J). The hat fits, but it's way too tight. The next one fit better. 
(That little speck you see on the back of my hat, is a hair clip that I'm using as a stitch marker.)
So on to the Pattern:
Materials: Any Worsted Weight yarn, Hooks J & K; C hook (optional for "bling")
Key: Ch-chain, DC-double crochet, st(s)-stitch(es), sl st- slip stitch, J/w-Join with, Rd(s)-round(s), BPDC-Back Post Double Crochet, Front Loop

Crown: Rd1: Magic ring (or ch 4, j/w sl st to form a ring). 12 DC in the ring. J/w sl st. 
Rd2: Ch 2, 1 DC in same stitch, 2 DC in each stitch after until back at the beginning. J/w sl st. (24 dc)
Rd3: Ch 2, DC in next st, *2 DC in next st, DC in the next 2 stitches*, repeat all around until back at the beginning. J/w sl st.
Rd4: Ch 2, DC in next 2 sts, *2 DC in next st, DC in next 3 sts* repeat all around until back at the beginning. J/w sl st.
Rd5: Ch 2, DC in next 3 sts, *2DC in next st, DC in next 4 sts*, repeat all around until back at the beginning. J/w sl st. (At this point I was able to stop making the crown of the hat. The diameter of the circle was 6-1/2". It fits approx a 21-22" head.)
Now we are going to make the Sides of the hat:
Rds6-10: Ch 2, DC in each stitch around. (This should bring you right to just above the top of your ears.)
Ready to start the ear warmer section? Change to the larger hook- K-
Rds11-15: Ch 2, Back Post Double Crochet (BPDC) in each stitch. Continue this around until you complete Rd15. (This creates the ridges to double the fabric to warm your ears.)

Rd16: Finish- Ch 2, SC in all the sts around, BUT insert your hook on the underside of the Front Loop Only. (This will show as another ridge, and is important to learn, in case you wish to customize your hat.) Now you're done, if you wish., but what if you want a little more "bling", or just another layer to the ear warmer???? Never fear, I'm here to show you how.
Let's Add Some Bling
(It will also add another layer to the ear warmer, making it even warmer.)
Doesn't this look Christmasy?
To add this layer, turn your finished hat upside down. We will be working on the last ridge formed.
(I used a Red Glit Eyelash yarn from Yarn Bee with a C hook)

Rd1: With a slip knot on hook, insert hook into the underneath front top loop of the first dc on the bottom ridge, do a SC (just to the left of the seam line), SC into that stitch again, then 2 SC into each stitch around until back to beginning of row.
(This yarn is a lot smaller in thickness, that's why 2 stitches into one, also the smaller hook.)
Rd2+: Join yarn into the seam line with a SC, then move to the next ridge, 2 SC in each stitch around exactly as done in R1, until back at the beginning. Repeat until all ridges are covered.
Now enjoy!
Note: This is very easy to resize simply by changing the crown circle hat, or yarn and hook size.
For more information on How to properly size crochet hats read this article. Good luck.
© LaceAngel 2016

What have I forgotten??

Okay, guess I didn't make time for blogging for quite a while hopefully, that will change. This really is just a "test" post to see what I've forgotten.
My little helper today, will be my constant companion (stuck like glue), a Chinese Crested named Rosie. She was a rescue. A gift to me from some friends. I encourage anyone who wants a loyal companion to visit your local humane society. And if you have pets, please spay and neuter them.


Saturday, August 6, 2011

A Month of "Sundays"

Well, "the day has come and passed".................retirement! As of today, I have officially been retired for one month. YEA! Guess I'd better change my "profile". My, where has the time gone?

I've heard "other people" say that they were so busy, after they retired, that they wondered how they ever had time to work. All I can reply, is that I've found the above statement to be "TOTALLY TRUE"!!! The first 3 weeks felt like an "extended vacation" without the traveling.
I'm still waiting for the phone to ring, and someone to ask, "When are you coming back? Don't you think that you've been off long enough?" NOT

The time so far has just flown by. I don't have a tenth of the projects completed that I intended to have done by now. Guess I'd better write a "to do schedule list". Of course, I do have some "unintended" projects completed (crochet, of course), and some more started. Anyone heard that Christmas is coming? LOL

Friday, April 1, 2011

Good-bye to my "4-footed angel"


Kayley was my beloved Lhasa Apso. She came to me in the early summer of 1997. I've had many dogs in my lifetime, but she was my special angel. Anyone who is a dog lover will understand the loss that I feel now. She was my friend, my confidant who always listened with unconditional love.
Her joy when I would come home after being gone, whether it was just a few minutes or from my work hours, made her day complete. She would curl up on a doggie pillow anywhere I happened to be, whether it was by my computer, or the living room couch, or bedtime.


She loved to travel with me, even though she had to wear her "doggy seatbelt" , seated upon 3 pillows to give her enough height to see out the windows. It was always an adventure that she enjoyed, whether the drive was just across town, or 5 to 13 hrs long. She never complained, but how she loved those "potty stops", all the new smells and sights to see.


I recently found out that I was actually her third owner, so her real age is really unknown to me, but I know she was between 15 and 17 years old. And as with people, her age was beginning to show a decline in her health. But she will always live in my heart and mind as long as I live. Goodbye, my sweet angel, I will love you forever. And I know someday we will be reunited, and that you will have the energy and health of your young life.

Monday, January 12, 2009

Mystery Calendar Afghan Crochet Along at Dishclothdiaries

Just doing some "surfing this morning" and ran across this Mystery Calendar Afghan Crochet Along at Dishclothdiaires. Thought it sounded like a lot of fun!

http://dishclothdiaries.blogspot.com/2009/01/winter-dream.html

Give it a try!

Friday, December 19, 2008


~REMEMBER the REASON for the SEASON~


I found this Nativity at a well known craft show in Indy. It is so unique. Each figure in the scene except the "Babe" and the sheep have a scripture imprinted into them.


The Angel


Mary and Jesus


May Love and Peace be your gifts for this Season and forever.

Tuesday, September 9, 2008

Life is Like Hot Chocolate

This was passed on to me in an email, and I liked it so much, I thought I would share with everyone! I don't know the author, but if anyone knows let me know who to give credit for this.

The seasons are a changin', and it will be time for this before you know it!


A group of graduates, well established in their careers, were talking at a reunion and decided to go visit their old University Professor, now retired.

During their visit, the conversation turned to complaints about stress in their work and lives.

Offering his guests Hot Chocolate, the Professor went into the kitchen and returned with a large pot of Hot Chocolate and an assortment of cups- porcelain, glass, crystal, some plain looking, some expensive, some exquisite - telling them to help themselves to the Hot Chocolate.

When they all had a cup of Hot Chocolate in hand, the Professor said:
"Notice that all the nice looking, expensive cups were taken, leaving behind the plain and cheap ones.

While it is normal for you to want only the best for yourselves, that is the source of your problems and stress. The cup that you're drinking from adds nothing to the quality of the Hot Chocolate. In most cases it even hides what we drink.

What all of you really wanted was Hot Chocolate, not the cup; but you consciously went for the best cups, and then you began eyeing each other's cups.

Now consider this:

Life is the Hot Chocolate;
Your job, money and position in society are the cups.
They are just tools to hold and contain life.

The cup you have does not define, nor change the quality of life you have.
Sometimes, by concentrating only on the cup, we fail to enjoy the Hot Chocolate God provides us.

God makes the Hot Chocolate, man chooses the cups.

So True! Hope you enjoyed this story as much as I did, and now I will share one of my favorite ways to enjoy Hot Chocolate.

Chill Chaser (and it does!)
1 evelope of your favorite Hot Chocolate Mix
1 heaping teaspoon of coffee creamer
Enough hot water to almost fill the mug
Add a shot of ButterShots Schnapps
Mini-chocolate chips and mashmallows
Enjoy and feel the cold just melt away!

Wednesday, June 25, 2008

Besides Crocheting !


Pictures are clickable, if you want a better view.

I've been waiting two years to get this project off the ground. But finally that "little area" was sided, and I could start putting this area together. I eventually want native plants (some people view them as weeds, LOL), surrounding this.
Also besides the purchased stones, I want to include rocks that have "memories", from people that I know and love, besides some gathered on trips.


Notice the "broken strawberry jar", I think it looks quite neat on it's side with plants, spilling out of it................ Reuse, recycle at every chance. The two praying angels were a gift for my birthday from special friends. The sound of the water is so soothing!

Friday, May 9, 2008

Works in Progress

Remember how you feel after a huge Thanksgiving Meal? Like your eyes were too big for your tummy.............. Well, I think maybe my works in progress are the same. LOL

This is a "shawl" that I am making for a friend for her birthday. I will probably modify the pattern somewhat as you end up working the "points" of the pineapples separately, and I dislike doing that so will add a "fan" between them bridging the points. This was an idea given by another person, using the Pineapple Fan Chair Set located at Celt's Vintage Crochet :
Pineapple Fan Chair Set
A chair back doily that works as a shawl if you use worsted weight and a large hook (like a K) that has pineapples in it. Will try and post a picture of this when it's finished.


Another project, I'm working on is another "My Favorite Pineapple Afghan" in spruce and cream. Have one square to go, and then the border.
This is soooooooo easy, and I love how they look when they are finished.


Another afghan is in the works also. A "Wedding of Roses Afghan" for a dear friend and her new husband. This one appears to be blocks but they are actually worked all in one piece, and since it's filet, this is very simple.


It's 3 blocks by 5, so it's almost 2/3 's of the way completed. Gee, hope they aren't in any hurry. I picked the "Claret" color in honor of the red roses given to her by her husband.


Another filet crochet project is a rooster that I am doing in thread for a Christmas gift for this year. It looks like it will be large enough to frame when completed.


And almost last, but no means, less important is a Round Rainbow Baby Afghan. I think this pattern is sooooooooooo special. I loved it the very first time I saw it. Just need to finish adding the fringe.


Now the last project is a CAL of a pineapple tote. I have everything except "the time" to get it rolling . (That's why there aren't any pictures of it yet.) LOL And that's just what is on the crochet front, also have some craft project ideas doodling around in my brain.
And with SPRING finially here, outside projects are also calling!
Happy Hooking to all! Lace


Friday, April 18, 2008

From a Kit

My mother knew my fasination with the "pineapple" and also knew that there was one "Kit" out there that I really wanted, so for my birthday one year, that was my gift. It's the only afghan that I made and kept for myself.


Wednesday, April 2, 2008

Pineapple Square Afghan

This was made for a friend of mine for her birthday. Love this pattern. Takes one skein of yarn per square (back when skeins were a full 4 ozs.). I use a ch 3 joining, which means that I don't have to sew the squares together. Can you tell the pineapple design is one of my favorites?


12 squares make the entire afghan. (Displayed on a queen size bed. Afghan measures 55" x 72") This yellow color happens to be my friend's favorite. Red Heart yarn was used.
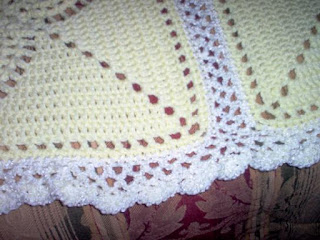
Here is a close up of the joining.


Kind of has the look of a trellis, doesn't it? Then I add just a simple shell edging.

This pattern was taken from an old Family Circle Magazine 10/20/83

Tuesday, April 1, 2008

Pineapple Christmas Ornaments - 2007

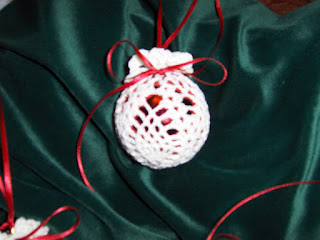
I wanted a special "little gift" for certain people in my life, so last year I decided on this Pineapple Crocheted Ball Cover. I used red metallic 2-1/2 plastic Christmas balls and used white #10 crochet thread.


Another friend decorates with peach, so this one was done:
On this one, I used a silver ball. The color combinations are only fueled by your imagination.
The original link no longer worked, so it has been updated. (10/3/2016)
The original pattern by Claudia Garza named Pineapple Sachet may be found here:
Pineapple Sachet
Enjoy! And bless the special people in your life also.

Tuesday, March 25, 2008

My Favorite Afghan

This was done for a girlfriend's daughter when she graduated.

I hope to find the pattern again and do a duplicate someday for me.

Anda_Grad_Afghan

I remember seeing this in a woman's magazine. (I believe it was Family Circle years ago.) It's done with an afghan hook, making a 3" square that you embroider with different designs, then you switch to a regular hook to finish the lace/popcorn design.

Anda_Grad_Afghan2 

This is just beautiful. I've never found a pattern to match it.

Thursday, February 21, 2008

February 21, 2008

Just starting this today, and we shall see where our travels take us. By hook, and yarn, thread and pattern.

Working on a filet "red rose" Wedding Afghan for a very special friend. 15 Red Roses (3 squares by 5 squares). The great thing is, it's done all in one piece, so "no joining" except for the "next skein" of yarn. YEA! Will post a picture when it's complete.